Let my folder go!

Recycle Bin

Your computer is yours. The files in it are yours. And you should have the right to execute them! No, not as in running them… But as in putting them to death.

But sometimes this happens:

The action can't be completed because the folder or a file in it is open in another program. Close the folder or file and try again.

Surely you wonder at this point why anyone would want to delete Shpongle. Relax, of course no one would ever want that – that’s ludicrous! But let’s say for a moment that you want to share Shpongle with a friend. And instead of emailing files directly from your music folder you decide to copy them first into a temporary folder, maybe on your desktop, then pick a few of your favs and zip them. Then you might attach the zip file from that folder to an email like I taught you and send it to spread happiness. And then you may try to delete the temporary folder – to no avail.

Why can’t I delete my own folder?

Well, technically, some app is using it. Sometimes you simply forgot to close it. But sometimes an app may erroneously keep an open handle to a folder even after it’s finished using it. (Gmail, for example, seems to have this bug where it keeps an open handle to a folder after attaching a file from it.)  Anyway, I think we can both agree that it would have been easier if the error message included the name of app.

So how do I fix this?

This would be one of these situations where it would be nice to use the Force. That might work… but today we will use Process Explorer. This little tool can easily identify which app is using your file and thus keeping the folder undeletable. It can even close the handle, freeing the file or folder without killing the app.

If you don’t have Process Explorer yet you can get it here. Notice you’ll get a ZIP file with 3 files in it. It’s what is known as a portable app – there’s no installation. Just extract the 3 files to wherever you want. Then open procexp.exe with administrator permissions (right click => Run as administrator => allow it to make changes to the computer when prompted.)

By the way, did you notice the “Windows Sysinternals” title on top of the page? Process Explorer is part of a great set of tools called Sysinternals which fulfills many fundamental duties. So fundamental that Microsoft acquired Winternals, the company that made them, back in 2006 and made the tools its own. And they’re all totally free.

To the point. Short instructions:

  1. Open Process Explorer
  2. Find the open handle to your file or folder
  3. Close the app or close the handle

I’ll explain.

Step #1: Identifying the culprit

Ok, so you’ve got Process Explorer running. And yeah, it looks kinda intimidating. That’s because this little tool is fully capable of replacing your Task Manager. What you can see here is a list of all the running processes (top section) and the list of open handles for the selected process (bottom section).

But that’s besides the point right now. Kindly ignore all that and hit the Find icon, or press Ctrl+F:

This should open a dialog box with a search field. Enter the name of the file or folder you (desperately) want to delete, or just part of it, and hit Search. After a little while you should see the results:

Process Explorer - Search Results

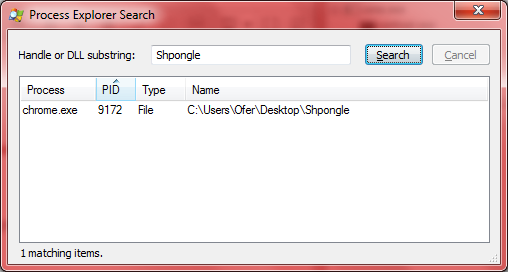
I guess we found the culprit.

Step #2: You could simply close the app

Ok, so now you know the name of the process, which should help you identify the app, in our example Chrome. At this point you could simply close the app and fix the problem. That would be the safest option and usually it is also the best. You could also kill the process (quite brutally) via Process Explorer. There is another option.

Or you could close the handle

Sometimes you may not want to close the bothersome app. For example if the app is your browser and you have many open pages. Instead, you can close only the handle, and that should fix the problem. But be aware that this is an aggressive act – you’d be pulling the rug from under the app, which might crash or behave unexpectedly. Still, if you believe the app is not really using the file but just hogging it, then there should be no problem.

So, how’s it done? In the results box choose the result from the list. The main window (behind) should change to reflect the selection:

The main window now shows the process (top section) and, more importantly, the specific handle (bottom section). Right click the handle and choose Close Handle. You will be warned: “Forcing a handle closed can lead to an application crash and system instability. Continue with close?”  You know what to do.

That’s it, you’re free!

And now for something completely different

A couple of alternatives to Process Explorer:

Unlocker – Supposedly provides the same service and with less clicks. According to the description it is ad supported, which could be annoying. Moreover, the app comes with an “Assistant” that runs quietly in the background. I’m not sure why.

WhoLockMe – A free tool that seems to integrate into Explorer. From what I can read it tells you who locked the file, but doesn’t provide a way to unlock it.

I haven’t tried these myself, but knock yourself out.

Google Analytics for mobile apps in Unity

Google Analytics + Unity

There are several solutions out there for integrating Google Analytics into Unity apps. However, as far as I can tell they all wrap the good old web tracking service. The guys at Google have long ago tailored a more suitable solution for mobile platforms: Mobile App Analytics. It provides a few mobile-only features (e.g.: user engagement, crashes and exceptions, device info) and has the added benefit of being official. Google have released SDKs for Android and iOS. In this post I will demonstrate how to integrate the Android SDK v2 into Unity apps. Be patient, iOS is on the road map.

Setup your Analytics Account

First of all you need to have a Google Analytics account. To use Mobile App Analytics you also need to add to your account an app tracking property and a profile. When you’re done you shall be the proud owner of a Tracking ID. It should look something like this: UA-123456-7.

Create an Android Plugin

I already covered the subject of creating an Android plugin in another post. I will expand on it to keep this post short.

Get the Analytics SDK

Download the Android SDK. (At the time of writing the version was 2.0 beta 5 and the download page warned that the SDKs are under “active development”.)  After downloading the ZIP file, extract libGoogleAnalyticsV2.jar from it (or whatever the JAR file is called) and add it to your Eclipse project.

This includes copying it to the libs directory and adding it to the build path. You may not see the JAR file in Eclipse until you refresh (F5). To add the JAR file to the build path right click on it and select Build Path => Add to Build Path.

MainActivity.java

We will subclass UnityPlayerActivity and use the EasyTracker class:

package com.companyname.appname;

import android.util.Log;

import com.google.analytics.tracking.android.EasyTracker;
import com.unity3d.player.UnityPlayerActivity;

public class MainActivity extends UnityPlayerActivity {
    @Override
    protected void onStart() {
        super.onStart();
        Log.d("Unity", "Starting Analytics activity");
        EasyTracker.getInstance().activityStart(this);
    }

    @Override
    protected void onStop() {
        super.onStop();
        Log.d("Unity", "Stopping Analytics activity");
        EasyTracker.getInstance().activityStop(this);
    }

    public void sendView(String screenName) {
        Log.d("Unity", "Sending Analytics view: " + screenName);
        EasyTracker.getTracker().sendView(screenName);
    }

    public void sendEvent(String category, String action, String label, Long value) {
        // value is optional
        Log.d("Unity", "Sending Analytics event: " + category + ", " + action + ", " + label + ", " + value);
        EasyTracker.getTracker().sendEvent(category, action, label, value);
    }

    public void sendTiming(String category, long intervalInMilliseconds, String name, String label) {
        // name and label are optional
        Log.d("Unity", "Sending Analytics timing: " + category + ", " + intervalInMilliseconds + ", " + name + ", " + label);
        EasyTracker.getTracker().sendTiming(category, intervalInMilliseconds, name, label);
    }
}

The calls to activityStart and activityStop are fundamental. They frame the session, allowing tracking of users, demographics and uncaught exceptions. Calling activityStart also sets the context for later sendXxxx calls to work.

The sendViewsendEvent and sendTiming methods allow manual sending of specific app information (screens, events and timings appropriately). These will be called by Unity scripts. By the way, don’t use trackXxxx methods – they’re deprecated.

There’s more stuff you can track which I haven’t covered here such as: campaigns, caught exceptions and in-app payments. See the dev guide for information on those.

You may want to know that EasyTracker is a wrapper for two other classes: GoogleAnalytics and Tracker. It makes life easier, but leaves out a few advanced features.

A note about onStop: When I pressed the Home button, my app was paused and onStop was called. When I called Application.Quit, it wasn’t. I don’t think it matters, but if it does to you feel free to read about session management.

analytics.xml

This is the configuration file for EasyTracker. Here we’ll setup our app’s Tracking ID as well as some other parameters:

<!--?xml version="1.0" encoding="utf-8" ?-->

    <!--Tracking ID-->
    UA-123456-7

    <!--Enable automatic activity tracking-->
    true

    <!--Enable automatic exception tracking-->
    true

    <!--Enable debug mode-->
    true

    <!--Set dispatch period in seconds-->
    120

Some of these parameters are self explanatory. And you can read about them and others here. A few notes though:

  • ga_debug – Enables writing of debug information to the log. The default is false (disabled). This may be useful for debugging, but be prepared to see error messages even when everything’s working smoothly (examples below.)  The output will be printed to logcat using the tag GAV2. For example, you can read both Unity’s logs and Analytics with the following command:
    adb logcat Unity:V GAV2:V *:S
  • ga_dispatchPeriod – The dispatch period in seconds. The default is 1800 (30 minutes). Yup, that’s a lot! It’s only 2 minutes on iOS. Feel free to reduce it. Setting it to 0 (zero) is useful for debugging. (But I suggest you don’t leave it that way in release versions.) Even then you can only find real-time information in the “Real-time” section in Analytics dashboard. Everything else is updated daily.
  • ga_appVersion – Your app version. No, this is not a mistake – it’s not used in the file above. No reason to! It defaults to the version found in the package, which in turn is determined by the bundle version in Unity’s player settings.

The analytics.xml file should generally be placed in the res/values directory in the project. However, the location doesn’t matter much until we copy it into the Unity project later. (It will reside in Assets/Plugins/Android/res/values.)

The Unity App

In your Unity app you’d probably want to call sendXxxx methods to track user engagement. The following Boo code calls the Java methods:

ifdef UNITY_ANDROID:
    static def Call(methodName as string, *args):
        jc = AndroidJavaClass("com.unity3d.player.UnityPlayer")
        jo = jc.GetStatic[of AndroidJavaObject]("currentActivity")
        jo.Call(methodName, *args)

    static def SendView(screenName as string):
        Call("sendView", screenName)

    static def SendEvent(category as string, action as string, label as string, value as long):
        joValue = AndroidJavaObject("java.lang.Long", value)
        Call("sendEvent", category, action, label, joValue)

    static def SendEvent(category as string, action as string, label as string):
        Call("sendEvent", category, action, label, null)

    static def SendTiming(category as string, intervalInMilliseconds as long, name as string, label as string):
        Call("sendTiming", category, intervalInMilliseconds, name, label)

The SendEvent method’s value parameter is optional. So are SendTiming method’s name and label parameters.

Adding the Plugin

To integrate the plugin we created into Unity:

  1. Copy the JAR file we created earlier to Assets/Plugins/Android.
  2. Copy libGoogleAnalyticsV2.jar to Assets/Plugins/Android.
  3. Copy analytics.xml to Assets/Plugins/Android/res/values. Create the subdirectories if needed.
  4. Edit your AndroidManifest.xml file in Assets/Plugins/Android and add the INTERNET and ACCESS_NETWORK_STATE permissions (see below).
AndroidManifest.xml

See this post for more information about this file. Here I will only mention the additions required by Google Analytics:

<?xml version="1.0" encoding="utf-8"?>
<manifest xmlns:android="http://schemas.android.com/apk/res/android">
  <uses-permission android:name="android.permission.INTERNET" />
  <uses-permission android:name="android.permission.ACCESS_NETWORK_STATE" />
  .....
</manifest>

Logcat

As I mentioned earlier it make take a while before you can see results online. So how can you tell if it’s working? Assuming you enabled debug mode (“ga_debug”) you should be able to get some feedback from the logs. However, some messages are quite confusing. Here are a few examples I encountered.

False error #1: Need to call initialize() and be in fallback mode to start dispatch

W/GAV2 ( 4211): Thread[main,5,main]: Need to call initialize() and be in fallback mode to start dispatch.
I/GAV2 ( 4211): Thread[main,5,main]: ExceptionReporter created, original handler is com.unity3d.player.ab

This error may appear when you call activityStart from your onStart method. I ignore it.

False error #2: connect: bindService returned false for Intent

I/GAV2 ( 3680): Thread[GAThread,5,main]: connecting to Analytics service
I/GAV2 ( 3680): Thread[GAThread,5,main]: connect: bindService returned false for Intent { act=com.google.android.gms.analytic
s.service.START (has extras) }
W/GAV2 ( 3680): Thread[GAThread,5,main]: Service unavailable (code=1), will retry.
I/GAV2 ( 3680): Thread[GAThread,5,main]: No campaign data found.
I/GAV2 ( 3680): Thread[GAThread,5,main]: putHit called

And then some:

I/GAV2 ( 3680): Thread[Service Reconnect,5,main]: connecting to Analytics service
I/GAV2 ( 3680): Thread[Service Reconnect,5,main]: connect: bindService returned false for Intent { act=com.google.android.gms
.analytics.service.START (has extras) }
W/GAV2 ( 3680): Thread[Service Reconnect,5,main]: Service unavailable (code=1), using local store.
I/GAV2 ( 3680): Thread[Service Reconnect,5,main]: falling back to local store
I/GAV2 ( 3680): Thread[GAThread,5,main]: Sending hit to store

It appears when the Analytics service tries to dispatch the data. This may be a few seconds after the app started, or maybe later if ga_dispatchPeriod is high. Anyway, it seems to happen consistently for me. It’s fine to ignore it, assuming it’s followed by good stuff.

Good stuff

Hopefully you’ll see something like this:

V/GAV2 ( 4211): Thread[GAThread,5,main]: dispatch running...
I/GAV2 ( 4211): Thread[GAThread,5,main]: User-Agent: GoogleAnalytics/2.0 (Linux; U; Android 4.0.4; en-us; GT-P7500 Build/IMM76D)
I/GAV2 ( 4211): Host: ssl.google-analytics.com
I/GAV2 ( 4211): GET /collect?................. HTTP/1.1
V/GAV2 ( 4211): Thread[GAThread,5,main]: sent 1 of 1 hits

Hits sent? You’re good to go.

A word on legality

The Google Analytics Terms of Service prohibit sending of any personally identifiable information (PII) to Google Analytics servers. So don’t.

Sending data from Unity

Share Text + Unity

I’m pretty new to Unity-Android integration, so I’m filled with pride after every little success. And I bet this one is pretty trivial, especially for Android veterans. But I’m posting it anyway – for the sake of Unity developers. There just aren’t enough examples out there that tie the pieces together.

I wanted my Unity app to have a share function. All it needs to do is send some text as is easily done on Android. All that is missing is a tiny Android plugin.

Android Plugin

I already covered the subject of creating an Android plugin in another post. I will expand on it to keep this post short.

MainActivity.java

Again I subclassed UnityPlayerActivity. This utilizes the main activity as context for starting a new intent. I then added a small method, shareText:

package com.companyname.appname;

import android.content.Intent;

public class MainActivity extends UnityPlayerActivity {
    public void shareText(String subject, String text, String chooserTitle) {
        Intent sendIntent = new Intent();
        sendIntent.setAction(Intent.ACTION_SEND);
        sendIntent.putExtra(Intent.EXTRA_SUBJECT, subject);
        sendIntent.putExtra(Intent.EXTRA_TEXT, text);
        sendIntent.setType("text/plain");
        startActivity(Intent.createChooser(sendIntent, chooserTitle));
    }
}

shareText takes 3 string parameters:

  1. subject – The desired subject line of a message. Note that not all senders send the subject. Make sure that your text is sufficient by itself.
  2. text – The actual text message to be sent.
  3. chooserTitle – The title for the chooser dialog. It is displayed when the user is prompted to choose how to send the data. For example, it can be “Share via”.

The Unity App

Now all that is left is to call the shareText method from within Unity. This Boo method does the trick:

ifdef UNITY_ANDROID:
    static def ShareText(subject as string, text as string, chooserTitle as string):
        jc = AndroidJavaClass("com.unity3d.player.UnityPlayer")
        jo = jc.GetStatic[of AndroidJavaObject]("currentActivity")
        jo.Call("shareText", subject, text, chooserTitle)

This method simply calls the Java method as documented by Unity.

That’s the whole deal. Enjoy.

The Duplicator duplicates

Duplicator Plugin

Just popped in to say thanks to the guys at Life in the Grid for their awesome WordPress plugin, Duplicator.

I had to switch to another host as my previous one, 8Tar, was crumbling down to the ground. (I guess that’s what you get for $0…) I installed the Duplicator plugin and created a backup in seconds. The next day 8Tar exhaled its final breath. After finding a new host (paid this time) I uploaded the backup I created and activated it. It just worked. Everything was restored in one go: database and files (posts, images, plugins, permalinks, users) – the whole package.

When thanks are due…